[ Time Sheet Overview |
Time Entry |
Finalize Time Sheet |
Submit Time Sheet ]
|
A. Time Sheet Selection
The Time and/or Leave Entry web page allows you to enter Time and Leave hours on an online Time Sheet.
You must first select the current time sheet to enter hours, or a previous time sheet to review.


If you have more than one job, first you choose the job for which you want to enter Time or Leave hours.
- Pick the Title and Department and the Pay Period and Status, by clicking on the associated circle in the My Choice column.
Make sure the pay period is correct.
Note the Status of that pay period timesheet:
- Not Started - You have not yet entered any information.
- In Progress - You have started a time sheet, but have not yet submitted it.
- Pending - Your time sheet is awaiting your supervisor's approval.
- Completed - Your time sheet has been approved and processed.
Once you have selected the correct job and pay period, click the Time Sheet button.
To Review a Completed Timesheet - click on the down arrow to the right of the Pay Period and Status for the relevant Title and Department and select the desired pay period. You will not be able to change a completed timesheet, however, unless the person in charge of payroll for your department gives you permission to change it and changes the date box for that time period back to either: In Progress or Not Started (This change is only possible for the previous pay period - if your hours have not already been processed.)
[ Top of Page ]
|
B. Time Sheet Overview
The page you see next
corresponds to the payroll period and job you selected in the previous screen.
The one below is similar to the one you would see if you are faculty or an instructor:
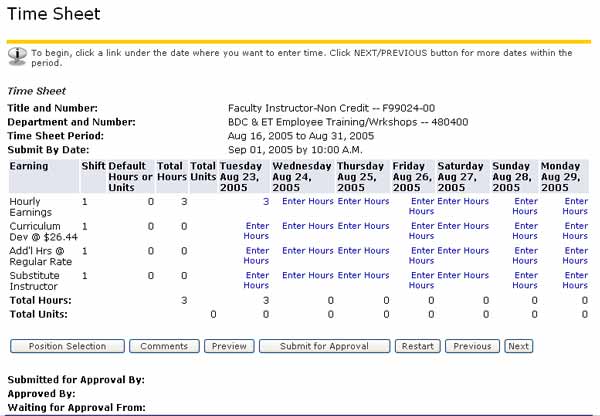
It opens a screen similar to the one below if you are an employee:
Scroll to the bottom of the screen to view the following buttons:
- Position Selection - Returns you to the Time Sheet Selection screen.
- Comments - Allows you to submit a comment with your time sheet.
- Preview - Takes you to the preview screen (shows the entire pay period).
- Submit for Approval- This button closes your time sheet and prepares it to be submitted for approval.
DO NOT PRESS THIS BUTTON UNTIL YOUR TIME SHEET IS COMPLETE FOR THE PAY PERIOD!
- Restart - This will reset your time sheet to have no entries.
- Next - Displays the next 7 days of the pay period.
[ Top of Page ]
|
C. Time Entry
- Entering Time and/or Leave for the Current Pay Period:
Pay Periods go from the 1st to the 15th and from the 16th to the end of the month.
Time sheet entry is the same process for both Employees and Faculty/Instructors.
- First select the row with the type of earning (or leave) you are entering (this is listed on the left side of the time sheet.)

- Next, click the Enter Hours spot on the time sheet - be sure you are on the correct row, and entering hours for the correct date), which will take you to the screen below where you will enter the number of hours you worked on that date. (You will need to click the Next button at the bottom of the screen to enter hours for the 2nd half of the pay period.)

- Next, enter the hours for that day in the "Hours" field.
- Finally, click the Save button to enter the number of hours into your time sheet.
- Your hours are then displayed in the correct spot on the timesheet.

- Copying Hours To Multiple Dates
You can copy the same number of hours to other dates by using the Copy button.
- As described above, click the Enter Hours link for the correct type of entry, and the correct date, and enter the number of hours in the "Hours" field - for the first date.
- Next, click the Copy button (instead of Save), which will take you to the Copy Hours screen (shown below).
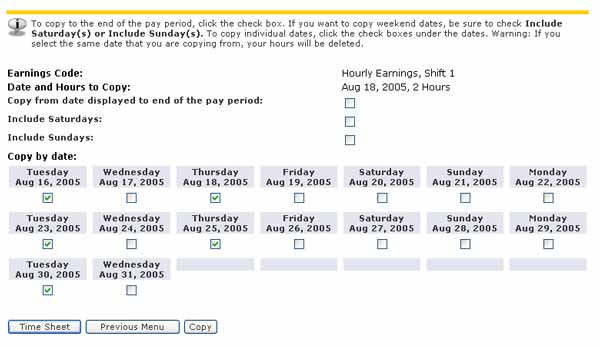
- You can now either:
- Click the checkbox to the right of Copy from date displayed to end of the pay period..
(If you are including weekend hours, be sure to click in the checkboxes to the right of "Include Saturdays" and "Include Sundays".).
or
- Click in the checkbox under each of the days you want to copy your initial hours to.
- Next, click the Time Sheet button at the bottom of the screen to return to your time sheet.
- Entering Other Types of Hours in Your Time sheet
Entering Vacation Time, Sick Time and other types of hours is the same process used for entering work hours as shown above.
[ Top of Page ]
|
D. FinalizeTime Sheet
- Adding Comments to Your Timesheet
If you want to add a Comment about any of your hours, click the Comment button at the bottom of your time sheet. Comments are displayed in a list.
(You cannot edit a comment once you have logged out of ExpressLane, but you can add an additional comment to amend a previous one. Your comments may be entered up to the time the record is submitted for approval.)

After adding your comment, click the Save button, and then click the Previous Menu button to return to your time sheet.
- Previewing Your Timesheet
Click the Preview button at the bottom of your time sheet to see what your submitted time sheet will look like.

- Editing Your Timesheet
To change any entry on your time sheet, just click on the entry you want to change and enter the correct hours.
[ Top of Page ]
|
E. Submit Time Sheet
Once you have completed your time sheet for the pay period, you click the Submit for Approval button to close it out and submit it.

(WARNING: Once you have clicked this button, you will not be able to change your time sheet for that pay period.)
Once you have clicked the Submit for Approval button, you will receive a confirmation message similar to the one below:

[ Top of Page ]
|
